Tutorial
How To Use social-auth-app-django with Facebook, Instagram, and LinkedIn

This tutorial is out of date and no longer maintained.
Introduction
Manually signing up for and signing into accounts online can sometimes prove onerous. Modern web applications solve this through social authentication, which is primarily a way to allow users to sign in (and sign-up) with the application using login information from a social network provider that they already have an account with.
In this tutorial, we will build a Django application that allows users to sign in via their Facebook, Instagram, and LinkedIn accounts.

To achieve this, we will use the social-auth-app-django library. We will also learn how to extract additional information such as the profile picture and username from the respective social accounts.
Prerequisites
To complete this tutorial, you will need:
- This project will require Python installed in a local environment.
- This project will utilize Pipenv. A production-ready tool that aims to bring the best of all packaging worlds to the Python world. It harnesses Pipfile, pip, and virtualenv into one single command.
This tutorial assumes that the reader has basic working knowledge with Django.
You also need to have an account with Facebook, Instagram, and LinkedIn.
Let’s dive right in!
Step 1 — Setting up the Django App
In this section, we will create a new Django project and install dependencies. Let’s start by creating a new directory:
- mkdir django_social_app
And making it the present working directory:
- cd django_social_app
We will create and activate a new virtual environment using Pipenv; this has the effect of creating an isolated Python environment and preventing us from polluting the global package directory when we install Django dependencies. We will also install django and social-auth-app-django:
- pipenv shell
Note: It is important that we run the commands from the terminal that is sourced into the virtual environment - i.e., displays (django_social_app) at the beginning of each command line.
- pipenv install django==2.1.5 social-auth-app-django==3.1.0
Note: This tutorial was written with Python v3.6, django v2.1.5, and social-auth-app-django v3.1.0.
social-auth-app-django showcases the implementation of social authentication with Django.
Let’s create (and navigate into) a new Django project, we will call it social_app:
- django-admin startproject social_app
Navigate to the new project directory:
- cd social_app
Next, we will create a Django application called core, this application will contain all our views and templates:
- python manage.py startapp core
Note: You need to be in the parent social_app directory to run python manage.py * commands.
Let’s find the settings.py file in the social_app project and add both core and social-auth-app-django as INSTALLED_APPS:
INSTALLED_APPS = [
    'django.contrib.admin',
    'django.contrib.auth',
    'django.contrib.contenttypes',
    'django.contrib.sessions',
    'django.contrib.messages',
    'django.contrib.staticfiles',
    'social_django', # add this
    'core' # add this
]
Finally, let’s migrate the database:
- python manage.py migrate
Configuring the Authentication Classes
Behind the scenes, Django maintains a list of “authentication backends” that it checks during user authentication. If the first authentication method fails, Django tries the second one, and so on, until all backends have been attempted.
The AUTHENTICATION_BACKENDS array contains a list of authentication backend classes (as strings) and is by default set to:
['django.contrib.auth.backends.ModelBackend']
We can update it and add new authentication classes in order to allow authentication with the social platforms we are considering in this tutorial.
To update this, add the following code in the settings.py file:
# [...]

# add this
AUTHENTICATION_BACKENDS = [
    'social_core.backends.linkedin.LinkedinOAuth2',
    'social_core.backends.instagram.InstagramOAuth2',
    'social_core.backends.facebook.FacebookOAuth2',
    'django.contrib.auth.backends.ModelBackend',
]
We just added the authentication backend classes for LinkedIn, Instagram, and Facebook.
You can find a list of the authentication backends classes supported by social-auth-app-django here.
Adding Templates and Static Files
We’ve only worked on setting up and configuring the application, let’s move on to something visual now. In this section, we will build the foundation of the templates that will display the application.
Let’s create a new folder in the core directory, we will call this folder templates:
- cd core
- mkdir templates
Create three files within the templates directory and call them:
base.htmllogin.htmlhome.html
Now, open the base.html file and paste in the following snippet:
    <!-- templates/base.html -->

    {% load static %}
    <!DOCTYPE html>
    <html lang="en">
    <head>
        <meta charset="UTF-8" />
        <meta name="viewport" content="width=device-width, initial-scale=1.0" />
        <meta http-equiv="X-UA-Compatible" content="ie=edge" />
        <link rel="stylesheet" href="https://stackpath.bootstrapcdn.com/bootstrap/4.1.3/css/bootstrap.min.css" integrity="sha384-MCw98/SFnGE8fJT3GXwEOngsV7Zt27NXFoaoApmYm81iuXoPkFOJwJ8ERdknLPMO"
            crossorigin="anonymous" />
        <link rel="stylesheet" href="{% static 'css/index.css' %}" />
        <title>Social Auth with Django</title>
    </head>
    <body>
        <div class="container-fluid">
            <div>
                <h1 class="text-white text-center">{% block title %}{% endblock %}</h1>
                <div class="card p-5">
                    {% block content %}
                    {% endblock %}
                </div>
            </div>
        </div>
    </body>
    </html>
Paste in the following snippet in the login.html file:
    <!-- templates/login.html -->

    {% extends 'base.html' %}
    {% block title %} Sign in {% endblock %}
    {% block content %}
    <div class="row">
        <div class="col-md-8 mx-auto social-container my-2 order-md-1">
            <button class="btn btn-danger mb-2">
                <a href="#">Login with Instagram</a>
            </button>
            <button class="btn btn-primary mb-2">
                <a href="#">Login with Facebook
                </a>
            </button>
            <button class="btn btn-info mb-2">
                <a href="#">Login with LinkedIn</a>
            </button>
        </div>
    </div>
    {% endblock %}
Lastly, update the home.html file with the code below:
    <!-- templates/home.html -->

    {% extends 'base.html' %}
    {% block title %} Home {% endblock %}
    {% block content %}
    <div class="row">
        <div class="col-sm-12 mb-3">
            <h4 class="text-center"> Welcome {{ user.username }} </h4>
        </div>
    </div>
    {% endblock %}
We need some styles to help our code look nice when rendered, so let’s create a folder called static in the root of the core folder and we will store our styles there.
Create a folder called css folder within the static directory and finally, create an index.css file within the css folder.
Now open the index.css file and update it with the following code:
    img {
      border: 3px solid #282c34;
    }
    .container-fluid {
      height: 100vh;
      background-color: #282c34;
      display: flex;
      justify-content: center;
      align-items: center;
    }
    .container-fluid > div {
      width: 85%;
      min-width: 300px;
      max-width: 500px;
    }
    .card {
      width: 100%;
    }
    .social-container {
      display: flex;
      flex-direction: column;
      justify-content: center;
    }
    .btn a, .btn a:hover {
      color: white;
      text-decoration: none ;
    }
Setting up the Views and URLs
In this section, we will define the Views and register the URLs that the application needs to work, so open the core/views.py file and replace its content with the snippet below:
from django.shortcuts import render
from django.contrib.auth.decorators import login_required

# Create your views here.
def login(request):
  return render(request, 'login.html')

@login_required
def home(request):
  return render(request, 'home.html')
Next, we will register the routes for the application and attach their matching view functions. Replace the content of the social_app/urls.py file with the code below:
from django.contrib import admin
from django.urls import path, include
from django.contrib.auth import views as auth_views
from core import views

urlpatterns = [
    path('admin/', admin.site.urls),
    path("login/", views.login, name="login"),
    path("logout/", auth_views.LogoutView.as_view(), name="logout"),
    path('social-auth/', include('social_django.urls', namespace="social")),
    path("", views.home, name="home"),
]
In the settings.py file, we need to set four new values — LOGIN_URL, LOGOUT_URL, LOGIN_REDIRECT_URL and LOGOUT_REDIRECT_URL — because they will be used in redirecting the user when authentication is complete:
# [...]

LOGIN_URL = 'login'
LOGIN_REDIRECT_URL = 'home'
LOGOUT_URL = 'logout'
LOGOUT_REDIRECT_URL = 'login'

# [...]
Fantastic! We can now run the application to see what we’ve built so far. Let’s start the server with this command:
- python manage.py runserver
Note: You need to be in the parent social_app directory to run python manage.py * commands.
We can view the application on http://localhost:8000, though we will be redirected to /login since we aren’t authenticated:

Looking good! In the next sections, we will register our application with the social network providers so that users can be authenticated via social platforms.
Step 2 — Integrating Facebook Authentication
In this section, we will do the heavy lifting and set up authentication via Facebook.
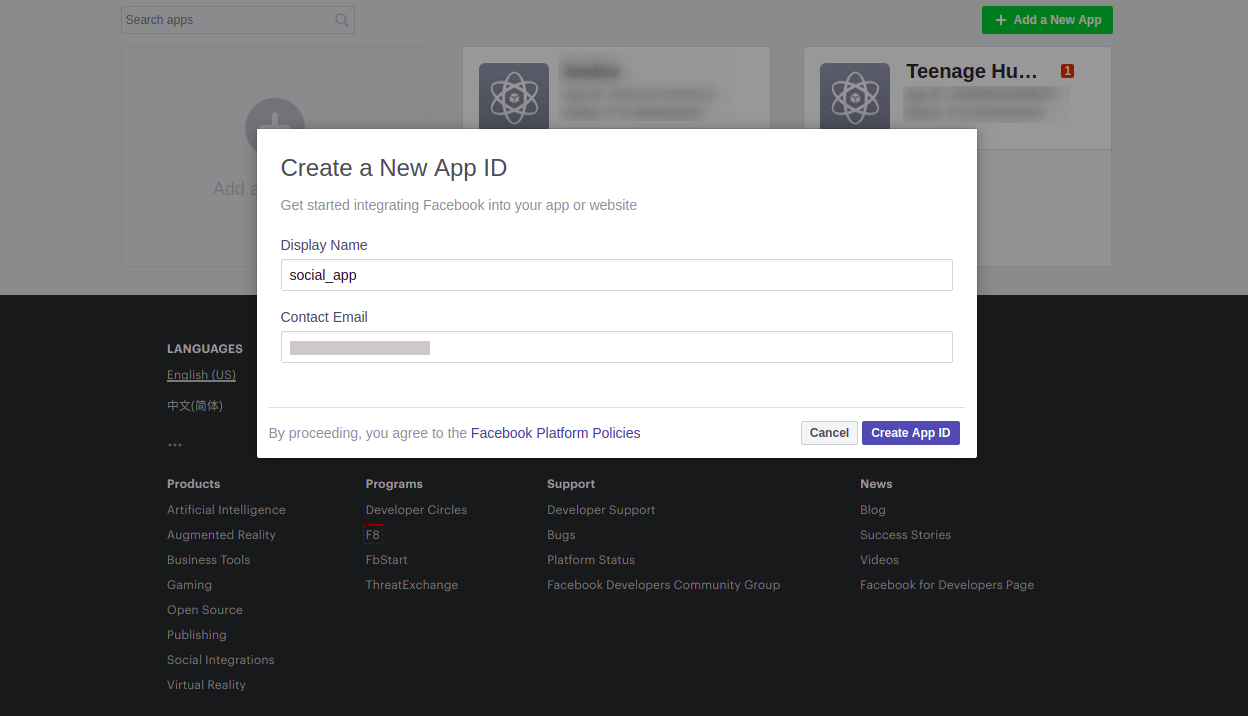
Acquiring API Credentials
Head over to the Facebook Developers page, after signing in, click on Add a New App and enter the details for the app on the modal window that appears:
Once the app has been created, you will be redirected to the application’s dashboard. On the left side of the screen, click on Settings, then click on the Basic option that appears directly underneath it.
When the new screen loads, under the App Domains section, add localhost like this:

Now scroll down until you see an option that says Add Platform, Click on it and select the Website option. This will create a website section where you will see Site URL, add http://localhost:8000/ in the input, and click on the Save Changes button:

Setting up the Backend
Now, copy the App ID and App secret from the applications dashboard and add them to the settings.py file:
#[...]

SOCIAL_AUTH_FACEBOOK_KEY = YOUR_APP_KEY        # App ID
SOCIAL_AUTH_FACEBOOK_SECRET = YOUR_APP_SECRET  # App Secret

#[...]
Replace the YOUR_APP_* keys with the values from your Facebook application dashboard.
Setting up the Frontend
Let’s update the URL of the Login with Facebook button in login.html file with this one:
    <!-- templates/login.html -->

            <button class="btn btn-primary mb-2">
                <a href="{% url 'social:begin' 'facebook' %}">Login with Facebook</a>
            </button>
Start up the web server and visit http://localhost:8000/login to test that we can now log into the application via Facebook:
- python manage.py runserver
Note: You need to be in the parent social_app directory to run python manage.py * commands.
When we click on the Login with Facebook button, we should be redirected to a page similar to the one below:

Clicking on Continue as USERNAME will redirect to the home page and your username will be displayed. We have successfully been authenticated via Facebook:

Want to know what just happened behind the scenes? Let’s find out; we will create a superuser account to access the admin panel:
- python manage.py createsuperuser
You will get a prompt to enter a username, email, and password for the superuser. Be sure to enter details that you can remember because you will need them to log in to the admin dashboard shortly.
After creating the superuser account, we will run the server and visit the admin panel on this address — http://localhost:8000/admin/:

We can see that a new User (besides the superuser) has been created in the Users category:

We will also see that there is a new account under the User social auths category:

The explanation for the existence of these new accounts is: When a user logs into the application using Facebook (or any social network provider), a new User and User Social Auth instance are created. The User Social Auth is linked to the User account the first time, then subsequently, the User instance is queried from the database.
The User instance is created using the details received from the social network provider. In this case, Facebook sent back the first_name and last_name fields of the created User instance, and the username is a concatenation of the first_name and last_name.
Some social providers (like Instagram) will return the user’s username on their platform and this is used (instead of the concatenation) for the created User instance on the application.
We don’t want our application to just display a username, we want to get additional User data such as the profile picture, so let’s request for extra data from Facebook.
Note: You will need to log out from the admin panel to continue.
Open the settings.py file and update it accordingly:
TEMPLATES = [
    {
        'BACKEND': 'django.template.backends.django.DjangoTemplates',
        'DIRS': [],
        'APP_DIRS': True,
        'OPTIONS': {
            'context_processors': [
                'django.template.context_processors.debug',
                'django.template.context_processors.request',
                'django.contrib.auth.context_processors.auth',
                'django.contrib.messages.context_processors.messages',
                'social_django.context_processors.backends', # add this
                'social_django.context_processors.login_redirect', # add this
            ],
        },
    },
]

#[...]

# add this code
SOCIAL_AUTH_FACEBOOK_KEY = YOUR_APP_SECRET          # App ID
SOCIAL_AUTH_FACEBOOK_SECRET = YOUR_APP_SECRET       # App Secret
SOCIAL_AUTH_FACEBOOK_SCOPE = ['email', 'user_link']
SOCIAL_AUTH_FACEBOOK_PROFILE_EXTRA_PARAMS = {
  'fields': 'id, name, email, picture.type(large), link'
}
SOCIAL_AUTH_FACEBOOK_EXTRA_DATA = [
    ('name', 'name'),
    ('email', 'email'),
    ('picture', 'picture'),
    ('link', 'profile_url'),
]
Replace the YOUR_APP_* keys with the values from your Facebook application dashboard.
The social_django context processors help in adding backend and associations data to the template context. This makes it possible for us to access data about the authenticated user using template tags. You can read more about it here.
When a user logs into the application via Facebook, we can access a subset of the user’s data using permissions; permissions are how we ask if we can access the data on Facebook. In the code above, SOCIAL_AUTH_FACEBOOK_SCOPE contains a list of permissions to access the data properties our application requires. The email and user_link permissions request access to the user’s Facebook email and profile link respectively.
Let’s start the server now, visit http://localhost:8000/login/, and attempt logging in via Facebook:

Clicking on Continue as USERNAME will grant the application access to the user’s private data on Facebook and for this reason, to request for some permissions, you will need to submit your application to be reviewed by the Facebook team to ensure that the returned data isn’t misused. You can find the list of Facebook permissions here.
SOCIAL_AUTH_FACEBOOK_PROFILE_EXTRA_PARAMS has a key — fields — where the value is a list of attributes that should be returned by Facebook when the user has successfully logged in. The values are dependent on SOCIAL_AUTH_FACEBOOK_SCOPE.
When a user logs in using Facebook, the Facebook API returns the data requested in SOCIAL_AUTH_FACEBOOK_PROFILE_EXTRA_PARAMS. To store the data in the database, we need to specify them in SOCIAL_AUTH_FACEBOOK_EXTRA_DATA.
The extra data will be stored in the extra_data field of the User Social Auth instance:

Now, let’s update the frontend to display the extra data we received from Facebook, we will open the home.html file and replace its content with this one:
<!-- home.html -->

    {% extends 'base.html' %}
    {% block title %} Home {% endblock %}
    {% block content %}
      <div class="row">
        <div class="col-sm-12 mb-3">
          <h4 class="text-center">Welcome {{ user.username }}</h4>
        </div>

        <!-- Add from here -->
        {% for auth in backends.associated %}

          {% if auth.provider == 'facebook' %}
            <div class="col-md-6 text-center">
                <img src="{{auth.extra_data.picture.data.url}}" alt="" width="150" height="150" style="border-radius: 50%">
            </div>
            <div class="col-md-6 social-container my-2">
                <p>Signed in via: {{ auth.provider }}</p>
                <p>Name: {{ auth.extra_data.name }}</p>
                <p>Provider url: <a href="{{auth.extra_data.profile_url}}">link</a></p>
            </div>
          {% endif %}

        {% endfor %}

        <div class="col-sm-12 mt-2 text-center">
          <button class="btn btn-danger">
            <a href="{% url 'logout' %}">Logout</a>
          </button>
        </div>
        <!-- End here -->

      </div>
    {% endblock %}
Now, we can visit the application’s home address — http://localhost:8000/ — on a web browser and see the extra data:

Note: We now have access to the data that gets stored in the extra_data field because we added the context processors to TEMPLATES; this enables us to access backends data in the frontend.
Congratulations! We have successfully authenticated via Facebook and can now move on to setting up the next social network provider.
Step 3 — Integrating Instagram Authentication
Seeing that we’ve gone into details on how things work behind the scene, we can set up the Instagram authentication in just three steps:
- Get API credentials
- Setup the backend
- Setup the frontend
Let’s go!
Acquiring API Credentials
Let’s visit the Instagram Developers page and click on Register Your Application:.

On the screen that comes up next, click on Register a New Client and fill out the details for the application:

Note: Instagram (and most social network providers) require a redirect URL which will be the address the user’s browser will be directed to after the authentication. For this tutorial, we will use this address http://localhost:8000/social-auth/complete/instagram/. You can learn more about this here.
Successful registration of the application will return a screen like this:

Now, we will click on the Manage option to get the application’s Client ID and Client Secret:

Note: We need the ID and the Secret to configure the backend.
Setting up the Backend
Let’s add this code to the settings.py file:
#[...]

# add this code
SOCIAL_AUTH_INSTAGRAM_KEY = YOUR_CLIENT_ID         # Client ID
SOCIAL_AUTH_INSTAGRAM_SECRET = YOUR_CLIENT_SECRET  # Client Secret
SOCIAL_AUTH_INSTAGRAM_EXTRA_DATA = [
    ('user', 'user'),
]

#[...]
Replace the YOUR_CLIENT_* keys with the values from your Instagram application.
With the code above, once a user is authenticated via Instagram, a user object will be sent back to the application. We add this object to SOCIAL_AUTH_INSTAGRAM_EXTRA_DATA because we want it to be stored in the database for reference.
The user object is returned in this format:
{
  "id": ...,
  "username": ...,
  "profile_picture": ...,
  "full_name": ...,
  "bio": ...,
  "website": ...,
  "is_business": ...,
}
Setting up the Frontend
We want to display a nice UI for when a user is authenticated via Instagram so let’s replace the content of the home.html file with the code below:
   <!-- home.html -->

    {% extends 'base.html' %}
    {% block title %} Home {% endblock %}
    {% block content %}
    <div class="row">
        <div class="col-sm-12 mb-3">
            <h4 class="text-center">Welcome {{ user.username }}</h4>
        </div>

        {% for auth in backends.associated %}

          {% if auth.provider == 'facebook' %}
            <div class="col-md-6 text-center">
                <img src="{{auth.extra_data.picture.data.url}}" alt="" width="150" height="150" style="border-radius: 50%">
            </div>
            <div class="col-md-6 social-container my-2">
                <p>Signed in via: {{ auth.provider }}</p>
                <p>Name: {{ auth.extra_data.name }}</p>
                <p>Provider url: <a href="{{auth.extra_data.profile_url}}">link</a></p>
            </div>
          {% endif %}

          <!-- Add from here -->
          {% if auth.provider == 'instagram' %}
            <div class="col-md-6 text-center">
                <img src="{{ auth.extra_data.user.profile_picture }}" alt="" width="150" height="150" style="border-radius: 50%">
            </div>
            <div class="col-md-6 social-container my-2">
                <p>Signed in via: {{ auth.provider }} </p>
                <p>Name: {{ auth.extra_data.user.full_name }} </p>
                <p>Provider url: <a href="https://instagram.com/{{ auth.username }}">link</a></p>
            </div>
          {% endif %}
          <!-- End here -->

        {% endfor %}

        <div class="col-sm-12 mt-2 text-center">
            <button class="btn btn-danger">
                <a href="{% url 'logout' %}">Logout</a>
            </button>
        </div>
    </div>
    {% endblock %}
Let’s update the URL of the Login with Instagram button in login.html file:
    <!-- templates/login.html -->

        <button class="btn btn-danger mb-2">
            <a href="{% url 'social:begin' 'instagram' %}">Login with Instagram</a>
        </button>
We can now start the server, visit http://localhost:8000/login, and try to login with Instagram:

Note: The Instagram application is in sandbox (test) mode. To make it live, you will have to submit it for a review. You can learn more about this here.
Once the application is authorized, the user will be logged in and redirected to the home page:

Step 4 — Integrating LinkedIn Authentication
We will set up LinkedIn authentication in three steps:
- Get API credentials
- Setup the Backend
- Setup the Frontend
Acquiring API credentials
Let’s visit the LinkedIn Developers page and click on Create app:

Fill out the application details:

Most of these fields are required and you will have to fill them out with valid structured data.
Once the app has successfully been created, you will be redirected to the application’s dashboard. Here, add http://localhost:8000/social-auth/complete/linkedin-oauth2/ as the redirect URL and update the application:

Take note of the Client ID and Secret, we will need it in setting up the backend.
Setting up the Backend
Let’s add this code to the settings.py file:
#[...]

# add this code
SOCIAL_AUTH_LINKEDIN_OAUTH2_KEY = YOUR_CLIENT_ID         # Client ID
SOCIAL_AUTH_LINKEDIN_OAUTH2_SECRET = YOUR_CLIENT_SECRET  # Client Secret
SOCIAL_AUTH_LINKEDIN_OAUTH2_SCOPE = ['r_basicprofile', 'r_emailaddress']
SOCIAL_AUTH_LINKEDIN_OAUTH2_FIELD_SELECTORS = ['email-address', 'formatted-name', 'public-profile-url', 'picture-url']
SOCIAL_AUTH_LINKEDIN_OAUTH2_EXTRA_DATA = [
    ('id', 'id'),
    ('formattedName', 'name'),
    ('emailAddress', 'email_address'),
    ('pictureUrl', 'picture_url'),
    ('publicProfileUrl', 'profile_url'),
]

#[...]
Replace the YOUR_CLIENT_* keys with the values from your LinkedIn application.
The SOCIAL_AUTH_LINKEDIN_OAUTH2_SCOPE array contains the permissions needed to access the user’s data, similar to what we saw when we set up authentication via Facebook.
The SOCIAL_AUTH_LINKEDIN_OAUTH_FIELD_SELECTORS array contains the list of data that should be returned when the user is successfully authenticated via LinkedIn. It is similar to the SOCIAL_AUTH_FACEBOOK_PROFILE_EXTRA_PARAMS array for Facebook. You can find the full list of data items that can be requested for here
The SOCIAL_AUTH_LINKEDIN_OAUTH2_EXTRA_DATA array contains the data that we want to store in the database for later reference.
Setting up the Frontend
Let’s replace the content of the home.html file with the code below:
    <!-- home.html -->

    {% extends 'base.html' %}
    {% block title %} Home {% endblock %}
    {% block content %}
    <div class="row">
        <div class="col-sm-12 mb-3">
            <h4 class="text-center">Welcome {{ user.username }}</h4>
        </div>

        {% for auth in backends.associated %}

          {% if auth.provider == 'facebook' %}
            <div class="col-md-6 text-center">
                <img src="{{auth.extra_data.picture.data.url}}" alt="" width="150" height="150" style="border-radius: 50%">
            </div>
            <div class="col-md-6 social-container my-2">
                <p>Signed in via: {{ auth.provider }}</p>
                <p>Name: {{ auth.extra_data.name }}</p>
                <p>Provider url: <a href="{{auth.extra_data.profile_url}}">link</a></p>
            </div>
          {% endif %}

          {% if auth.provider == 'instagram' %}
            <div class="col-md-6 text-center">
                <img src="{{ auth.extra_data.user.profile_picture }}" alt="" width="150" height="150" style="border-radius: 50%">
            </div>
            <div class="col-md-6 social-container my-2">
                <p>Signed in via: {{ auth.provider }}</p>
                <p>Name: {{ auth.extra_data.user.full_name }}</p>
                <p>Provider url: <a href="https://instagram.com/{{ auth.username }}">link</a></p>
          {% endif %}

          <!-- Add from here -->
          {% if auth.provider == 'linkedin-oauth2' %}
            <div class="col-md-6 text-center">
                <img src="{{auth.extra_data.picture_url}}" alt="" width="150" height="150" style="border-radius: 50%">
            </div>
            <div class="col-md-6 social-container my-2">
                <p>Signed in via: LinkedIn</p>
                <p>Name: {{ auth.extra_data.name }}</p>
                <p>Provider url: <a href="{{auth.extra_data.profile_url}}">link</a></p>
            </div>
          {% endif %}
          <!-- End here -->

        {% endfor %}

        <div class="col-sm-12 mt-2 text-center">
            <button class="btn btn-danger">
                <a href="{% url 'logout' %}">Logout</a>
            </button>
        </div>
    </div>
    {% endblock %}
We will also update the URL of the Login with LinkedIn button in the login.html file:
    <!-- templates/login.html -->

        <button class="btn btn-info mb-2">
            <a href="{% url 'social:begin' 'linkedin-oauth2' %}">Login with LinkedIn</a>
        </button>
We can now start the server, visit http://localhost:8000/login, and try to login with LinkedIn:

Once we authorize the application by clicking on Allow, we will be directed to the homepage:

Conclusion
We have come to the end of this tutorial and have learned how to set up social authentication in Django using the social-auth-app-django library with minimal configuration. We have also learned how to request extra user data once the user has been authenticated via a social network provider.
As we discussed at the beginning of this article, the importance of social authentication in modern web applications cannot be overemphasized.
Thanks for learning with the DigitalOcean Community. Check out our offerings for compute, storage, networking, and managed databases.
author
This textbox defaults to using Markdown to format your answer.
You can type !ref in this text area to quickly search our full set of tutorials, documentation & marketplace offerings and insert the link!


Get our biweekly newsletter
Sign up for Infrastructure as a Newsletter.

Hollie's Hub for Good
Working on improving health and education, reducing inequality, and spurring economic growth? We'd like to help.

Become a contributor
Get paid to write technical tutorials and select a tech-focused charity to receive a matching donation.

This is one of the best tutorials that could have been made on social athentication with Django. Thank You so much.
This document is old. So I used this setting for LinkedIn.
SOCIAL_AUTH_LINKEDIN_OAUTH2_SCOPE = [‘r_liteprofile’, ‘r_emailaddress’] SOCIAL_AUTH_LINKEDIN_OAUTH2_FIELD_SELECTORS = [‘id’, ‘firstName’, ‘lastName’, ‘profilePicture(displayImage~:playableStreams)’, ‘emailAddress’] SOCIAL_AUTH_LINKEDIN_OAUTH2_EXTRA_DATA = [ (‘id’, ‘id’), (‘fullname’, ‘name’), (‘emailAddress’, ‘email_address’), (‘profilePicture’, ‘picture_url’), (‘publicProfileUrl’, ‘profile_url’), ]
i am getting error when i put
SOCIAL_AUTH_FACEBOOK_SCOPE = ['email', 'user_link']on facebook login.Invalid Scopes: user_link. This message is only shown to developers. Users of your app will ignore these permissions if present. Please read the documentation for valid permissions at: https://developers.facebook.com/docs/facebook-login/permissionsthe tutorial is very helpful and easy to follow , yet I am facing a problem that was not addressed by the tutorial with the linkedin profile picture in the home.html template <img src=“{{ass.extra_data.picture_url}}” alt=“” width=“150” height=“150” style=“border-radius: 50%”>
that should extract the actual profile picture from the url from the extra data field which has an element named picture_url that contains 2 elements the first is displayImage containing the urn of the image and the second is displayImage~ that contains the actual detail of the image url and attributes for 4 diffrent image sizes 100100, 20200, 400400, and 800800
when using src=“{{ass.extra_data.picture_url}}” the result image sourrse is all the data for picture_url with all elements and when using src=“{{ass.extra_data.picture_url.displayImage}}” the result is only the urn that doesnt translate into an image and there is no way to define src=“{{ass.extra_data.picture_url.displayImage~}}” (results in a tilde error
is there a way to extract a specific image url from the displayImage~ ?
How to get current user id in view.py?
backends.associated is not defined in view.py
Could you update this page to support the Instagram API changes? I’ve successfully configured facebook and linkedin but am still having trouble with instagram. I’m currently using the “basic display API” but when I click the instagram button on the login page I am getting the following:
{“error_type”: “OAuthException”, “code”: 400, “error_message”: “Invalid redirect_uri”}
I tried to configure the settings in the facebook developers dashboard but I haven’t had any success.
An update would be greatly appreciated!
Thank you!
Thanks .This tutorial is great.Can you add details like how to sotre details to db,check whether a user is already logged in,etc? Hopefully in another tutorial? Or give me a link if such a tutorial exists on digitalocean?
Thank you so much for this tutorial, however you wrote that the site URL should be http://localhost:8000/ while in the image you wrote http://localhost:8081/